Here is my complete guide to The Wildercorps Hunters for Warcry. See below for the YouTube version but if reading is more your thing then welcome and lets go!
Reaction
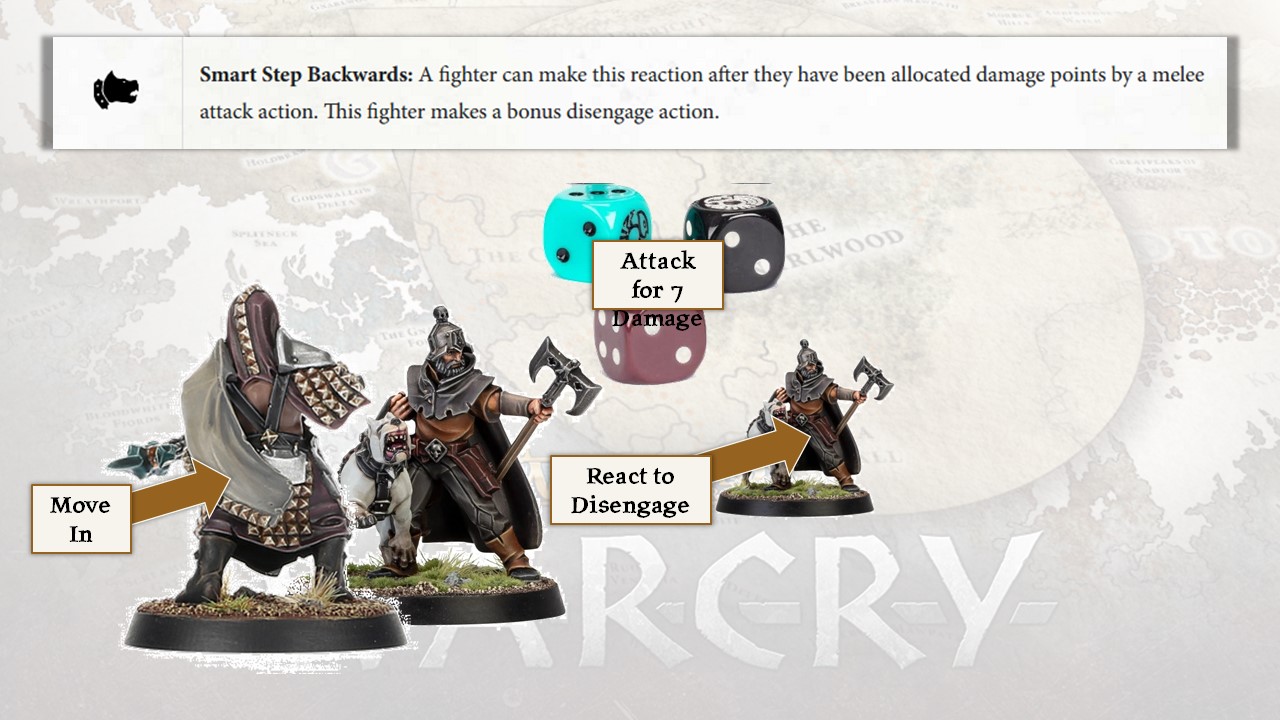
Oh Hey! It's my favourite reaction in the game; The Hunters of Huanchi reaction, now ported over to the Wildercorps Hunters has proved to be extremely versatile, especially in strike and fade playstyles that both flavours of hunters promise.
It allows you to make a bonus disengage action after seeing the damage dice from an opponent's melee attack which gives you the option of either staying in combat (if the dice come up as being poor with little chance of your opponent killing you with their next attack), or leave (if the damage on the second attack would be high enough to outright kill your fighter).
Of course, this leads to the situation where your fighters are actually more survivable then their base stats would normally allow, with opponents requiring on average one more attack to kill your fighters, and wasting extra move actions on subsequent turns to catch your fighters that have already disengaged last turn.
Ideally to get the best use out of the action, you would want to be engaged with your full wound fighters at the end of the turn going into the next, meaning that your opponent's engaged fighter would be pinned in place, ideally having to disengage or attack in which case you can disengage, thereby wasting their second action. If your opponent does a move-attack action, then there is no need to use the reaction and you've got the opportunity to activate afterwards.
There are however, a number of questions around this reaction and how it works so I'll address them in turn;
How Much Damage Do You Take?
This question comes from an early review of the Hunters of Huanchi reaction and a general misreading of the rules which indicated that because damage is allocated one point at a time, the reaction means that your fighters only take one damage point and then run away. The reason why this is not the case is the followig;
The slippery reaction reads 'a fighter can make this reaction after they have been allocated damage points by an attack action' with the emphasis on 'damage points' as opposed to 'a damage point'.
The reaction also doesn't end the attack sequence right then and there, so even if it did read as 'allocated a damage point', and you used slippery to get away, the allocation of further points would continue until all points are allocated or the fighter is dead; The reason for this being that you check range in step 1 of the attack sequence (pick weapon and target) and there is no rule that says something along the lines of 'if at any point during the attack sequence the target is no longer in range, etc. etc'.
For it to work like some people are suggesting, the wording would have to be something like this: 'a fighter can make this reaction after they have been allocated a damage point by a melee attack action. This fighter makes a disengage action and the attack sequence immediately ends' as per their wording for other game systems like AoS and WH40k (I tried to look for an analogy in Warcry but there doesn't seem to be one for whatever reason). Otherwise it would make the reaction the absolute best damage reduction ability in the game (and actually game-breaking).
tl;dr you take all the damage of the attack
Of course, this leads to the situation where your fighters are actually more survivable then their base stats would normally allow, with opponents requiring on average one more attack to kill your fighters, and wasting extra move actions on subsequent turns to catch your fighters that have already disengaged last turn.
How Much Damage Do You Take?
Can You Use The Disengage At 3" Range?
This comes from some dispute within the Disengage rules where it mentions that if you are within 1" range of an enemy fighter you can perform a disengage. There are a number of caveats to this however which allow the use of reactions that give a bonus disengage action at 3" instead of 1":
- The 1" range requirement is only to perform a disengage action under normal circumstances. (Pg69 of the core rules)
- The disengage action itself is only to move 3" and end more then 1" away from enemy fighters (Pg69 of the core rules)
- The skink reaction is to perform a disengage action if they take damage by a melee attack.
This in effect replaces the 1" range requirement to perform the action normally, because the actual wording on disengage is 'if this fighter is within 1" range if an enemy fighter, they can make a disengage action'; If you get hit by any melee attack (an attack with maximum range of 3 or less), you can react, perform your disengage, and move 3" as long as you end more then 1" away from all enemy fighters.
tl;dr You can use the reaction to make a disengage action within 3"
Wildercorps Warden
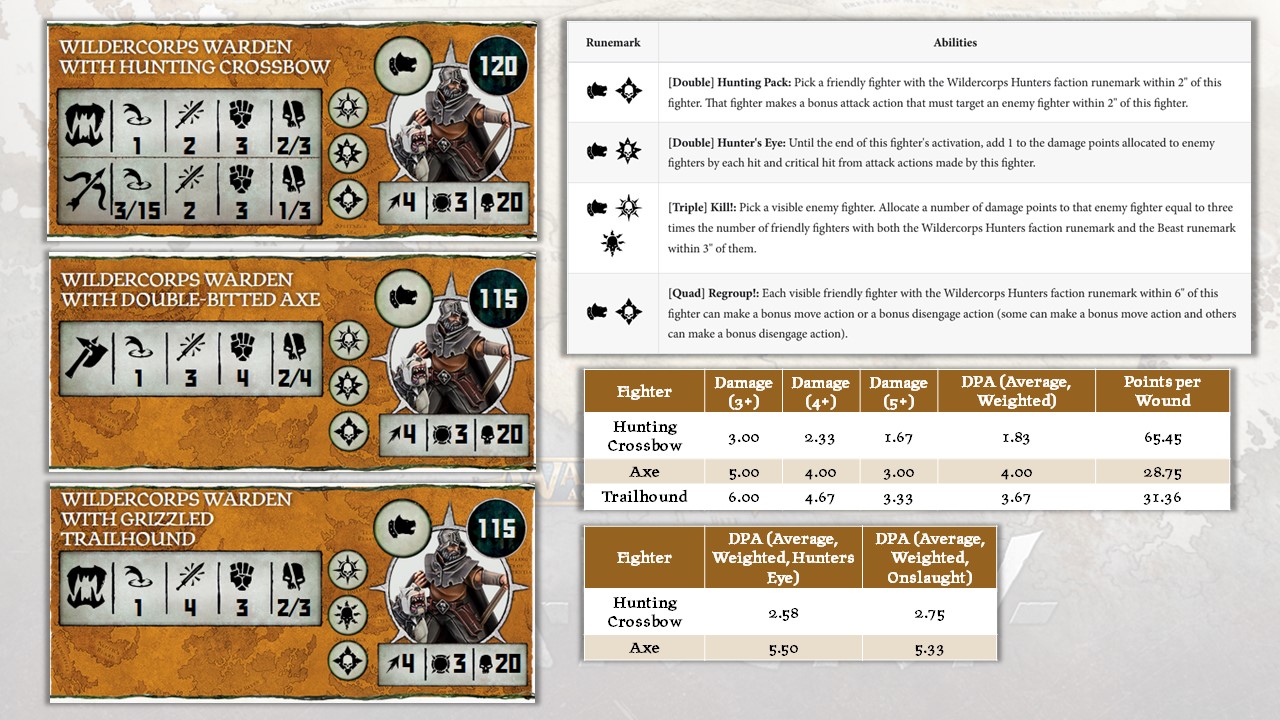
The Wildercorps Warden is your leader. There are a few flavours of him and we will address each of them in turn but the main question that you want to ask yourself is whether you want the option to use the Kill! ability with your dogs or if you value the slightly improved damage from the Double-Bitted Axe along with Hunter's Eye.
My personal feelings on this are that the Warden itself is a very middling melee fighter with relatively poor defensive stats so it's better off leaning into the gimmick of the warband itself and go with the Grizzled Trailhound.
My personal feelings on this are that the Warden itself is a very middling melee fighter with relatively poor defensive stats so it's better off leaning into the gimmick of the warband itself and go with the Grizzled Trailhound.
Hunting Pack
Hunting Pack is the bread and butter ability of the warband; It allows you to set up protection zones around your fighters, especially those with crossbows and/or range 2 melee attacks so that for the relatively low price of a double, you can get extra attack actions on enemy fighters who might otherwise try and attack, and also offering some way to counter your loss of actions from Smart Step Backwards.
I have been using this to good effect, placing my Trailblazers with Crossbows within 2" of each other for them to offer close support where the 4 extra shooting attacks per Hunter's eye activation can get that extra damage you'll need to kill opponent's generally tougher fighters.
Hunters Eye
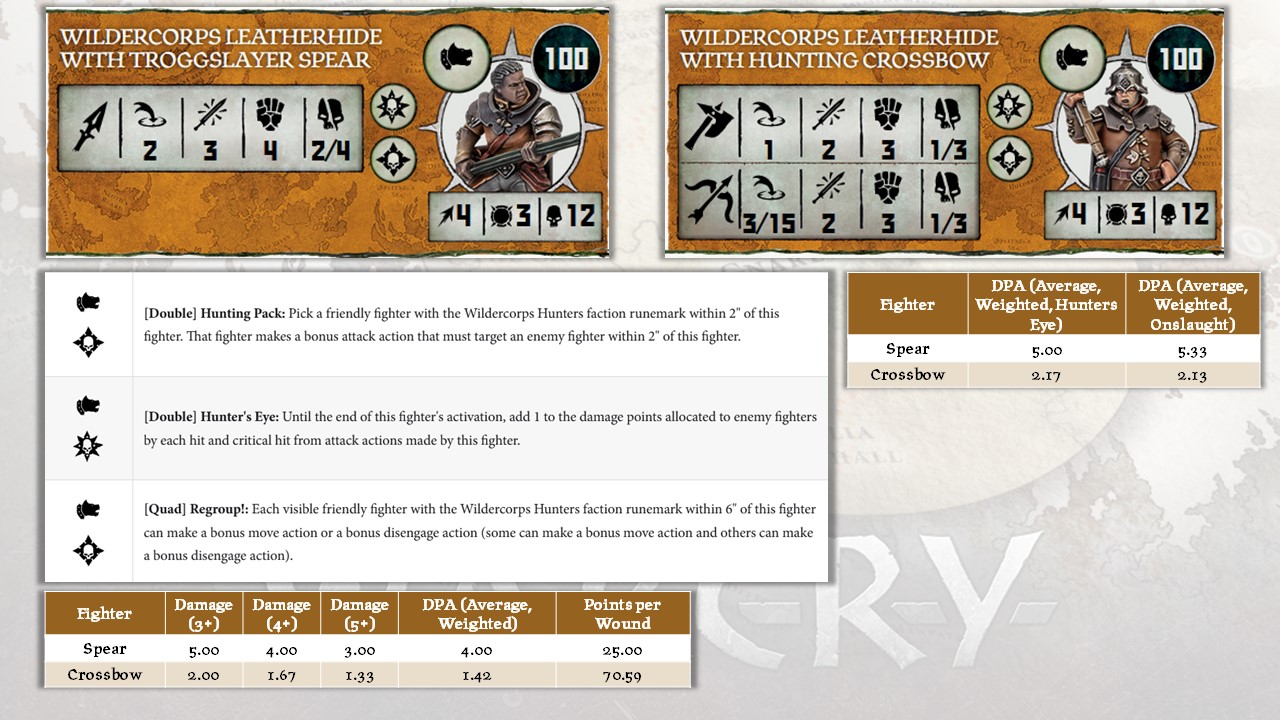
Hunter's Eye as an ability is available to a number of fighters in the warband where the prospect of +1 damage to hits and crits could net a good chunk of extra damage. The real question is if it generates more damage overall then a simple onslaught offering +1 attack.
The answer depends on your strength and what you are rolling to wound on; As a general rule, if you are wounding on a 3+ already, damage boost abilities will be able to pip the extra attacks, whereas if you are wounding on a 5+, the extra attack will generally be more useful. In the case of the Huntmaster with Axe, the average damage of Hunter's eye just pips the damage from Onslaught but in reality, this boost is minor.
Kill!
DOGS! Probably the reason you are playing Wildercorps Hunters in the first place, and it's likely you'll include at least a couple so there is probably always the possibility that Kill! will at least do 3 damage. It's similar to the Royal Beastflayers pack tactics ability but with the added restriction that it only works with your Dogs, BUT it does 3 damage per hound instead of 2.
I'll be addressing this later but one of the questions you need to think about is how to maximise this ability's damage, whilst not heavily skewing your warband into one line of play. On this point I think that it would be useful for at least the Warden's deployment group to also contain the majority of the dogs in your warband so that if he is charged, you can get a good chunk of extra damage from Kill!
Regroup
Normally I would probably relegate a quad like this to being 'not as good as rampage' and therefore not worth your time. However, after playing the faction a bit, I do think that situationally it isn't totally terrible. It lines up with what the Wildercorps Hunters want to do (waste opponent actions by being in combat and running away whilst applying pressure with your ranged abilities), and offers a small boost to their movement with free move actions which is something that they seem to want (as crossbows for example would prefer to attack twice as opposed to once along with a move action to get in range).
Arbalester
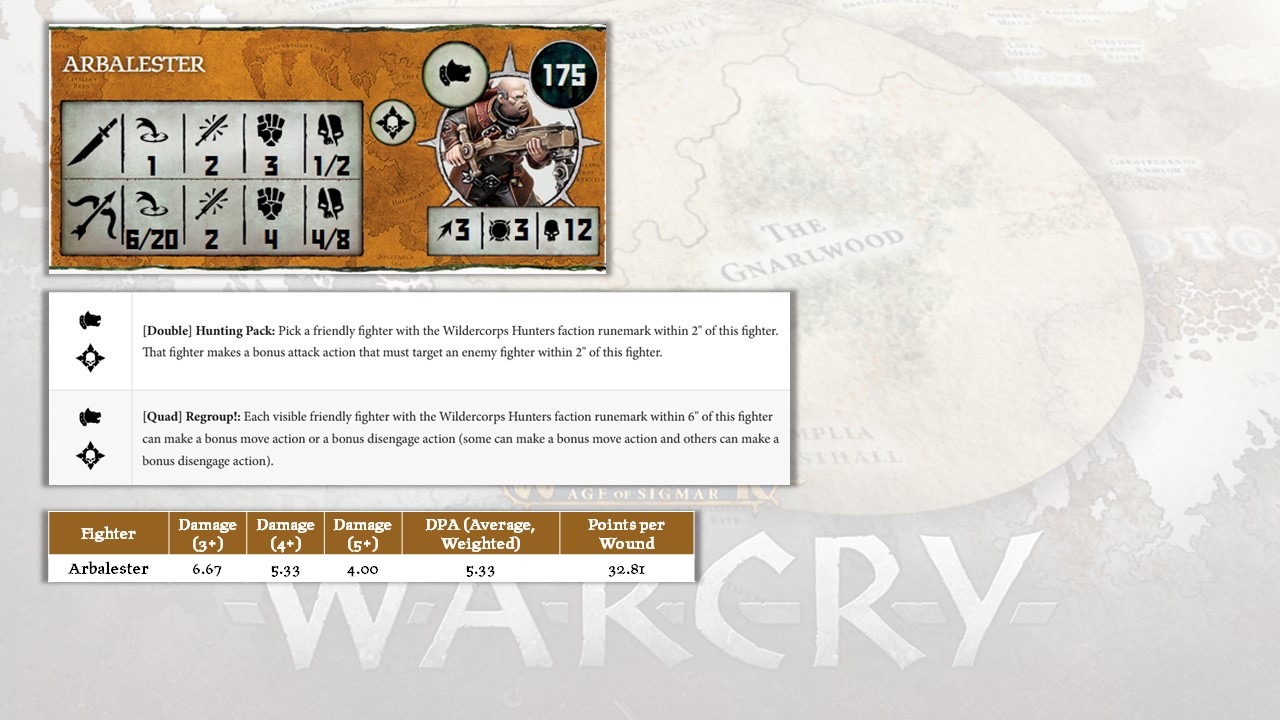
If you take one thing from this guide it's to ALWAYS TAKE AT LEAST ONE ARBALESTER. With their 20" range they are able to influence almost the whole board, with the ability to shoot fighters in other deployment groups in some situations. Ultimately this piece will mostly be standing still and firing it's 4 shots with average 10+ damage into anything that you want removed from the board.
Ideally you want ways to either increase the amount of times that the Arbalester can shoot, either through a Fight for Profit Kharadron Overlord ally or Calthia Xandire, or increase it's chances of hitting through strength boosts such as Divine Blessings.
Wildercorps Leatherhide
You will see some threads of commonality between a number of the Wildercorps fighters; namely combat weapon or crossbow. I think that in the case of the Leatherhides, despite being able to Hunter's Eye at range, the Troggslayer Spears are definitely the way to go. The Crossbow doesn't offer enough damage for the 100 points you are paying (especially compared to the 90 point Trailblazers we will be looking at soon). The spears, whilst not the most damaging of weapons, at least has the strength 4 with a 2/4 damage profile and a 2" range which has some synergy with Hunting Pack for extra attacks.
One thing to note is that the Troggslayer spears have the same melee profile as the Wildercorps Warden with Axe at a 15 point discount so if I were pressed to take them in my lists, I'd be looking at those and taking the Hunting Hound on my Warden.
Trailblazer
They come with their own triple; Trailblazer's Might which allows them to score crits on a 5+ but very much like Hunter's Eye, there is little difference in the the melee statline at least when compared to onslaught as a double. On the twin crossbows however, Trailblazer's Might nets almost 3 additional points of damage over a shoot-shoot activation which is enough to push a Trailblazer into 8 wound chaff killing territory.
Hunting Pack is especially good with the Crossbow build as their 8" range allows them to always be in range of those shots if the ability is used on them. Out of the box you have enough crossbow parts to convert 2 additional Trailblazers out of scouts so I would recommend that you bring 3x Crossbow Trailblazers in the majority of your games.
As with the Leatherhide, the crossbow build of the Wildercorps Scouts is very sub-par, with the Paired Hatchet build doing the same damage at range, and twice the damage in combat for the same cost. Whilst being cheaper then Trailblazers, and having 10 wounds, their 75 point price tag makes for difficult fighters to be included in your warband, especially considering your Trailhounds are 15 points cheaper and fill the role of chaff units arguably as good with their M6.
DOGS AGAIN! Everyone is raving over the dogs and are probably the reason you picked up the warband in the first place. Long story short; they aren't all that great, and are expensive thanks to their M6 BUT allow you to use the Kill! ability on your leader, which is probably the most damage you will get from them given their 2 attacks and only 6 wounds, but a 2/3 damage profile is decent enough.
They have their own double; Death Grip which warrants explaining; On the face of it the ability looks pretty good with a -1 action penalty to the target if the Trailhound hits with any of it's attacks. However, as per the Janurary 2023 errata, hits and crits in Warcry are classified as separate things so this means that if a Trailhound scores a crit and a miss with it's attacks, Death Grip will have no effect (because crits =/= hits). This means that against the majority of opponents, who the hound will be wounding on a 5+ thanks to their toughness 4, Death Grip will only work 16.6% of the time.
I do think that most lists will be looking to take anywhere in the region of 2-4 Trailhounds just so that you can use that Kill! ability and also have some cheaper, M6 chaff units on the board. Any more then that seems to be pushing the list into imbalanced territory where most, if not all of the damage will have to come from either your Arbalester or rely on rolling triples.
Allies
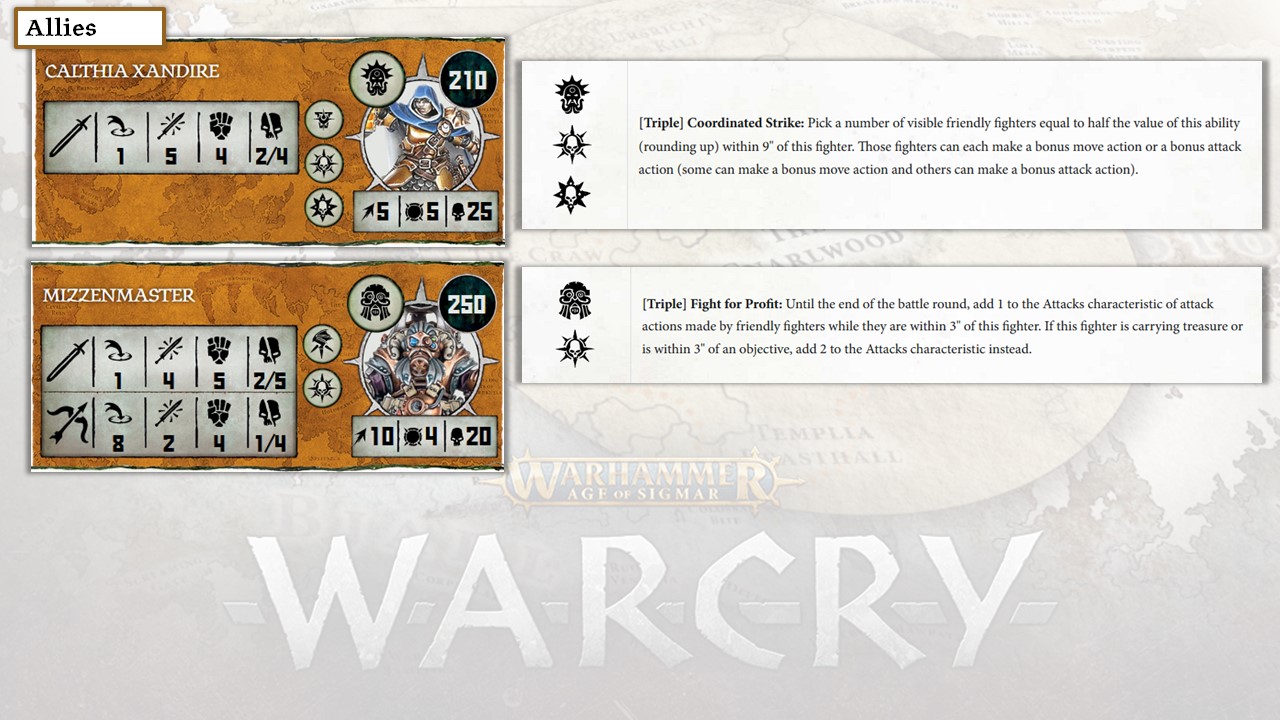
I've included here your normal list of ranged attacking, strike and fade style allies; namely Calthia Xandire and a Fight For Profit Kharadron Overlords character. Calthia brings alot to the table with her triple allowing up to 3 other fighters to either move or perform a bonus attack action, whilst the FFP character gives more shots to any friendly fighters within it's 3" range. The pros and cons of both are:
- Calthia's ability is 9" range so can effect a wider area of the board.
- Calthia is much faster and more survivable then something like a Company Captain.
- The FFP character needs to stick to the Arbalaster in order to maximise it's damage whilst Calthia has freedom of movement.
- If the FFP character gets near an objective he nets 2 more Arbalaster shots then Calthia's standard ability. (11 shots is better then 9 BUT does it really matter with the Arbalester's high base damage?)
- If you use the Blessing of strength on the Arbalester; it nets average 20 damage in one turn at 20" with Calthia or the FFP character wounding on a 3+
- An instant speed attack (Calthia) is better then a delayed buff and then attack (FFP character)
Listbuilding
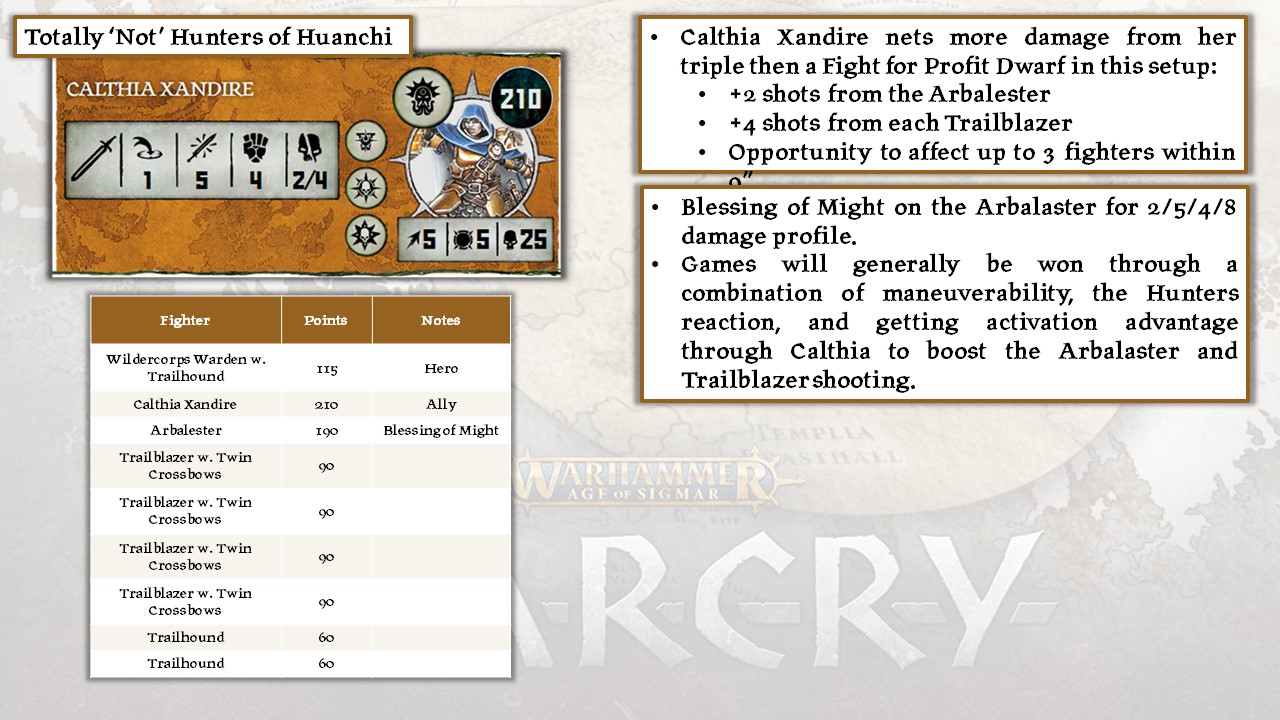
I've got here my initial tournament list for the Wildercorp Hunters which incorporates everything that we have talked about already in this guide; We have gone with the Warden with Trailhound who deploys with his two Dogs allowing for some nice instant Kill! ability plays if they are close enough to the enemy on deployment. the 4x Trailblazers with Crossbows offer a deceptively high amount of damage through their own 4 shots per attack and additional shots from Hunting Pack.
We are using the +1 Strength Divine Blessing Arbalester to either start shooting at key targets on turn 1 or to take one a fighter per turn by shooting at 8-10 wound chaff which really helps in the activation wars for a warband that wants to outnumber their opponents.
Finally we are using Calthia Xandire to enable the Arbalaster and up to two additional Trailblazers to shoot additional times during the turn. Between her and Hunting Pack, there is a surprising amount of additional damage that can come from this list, and initial testing so far has been extremely positive.
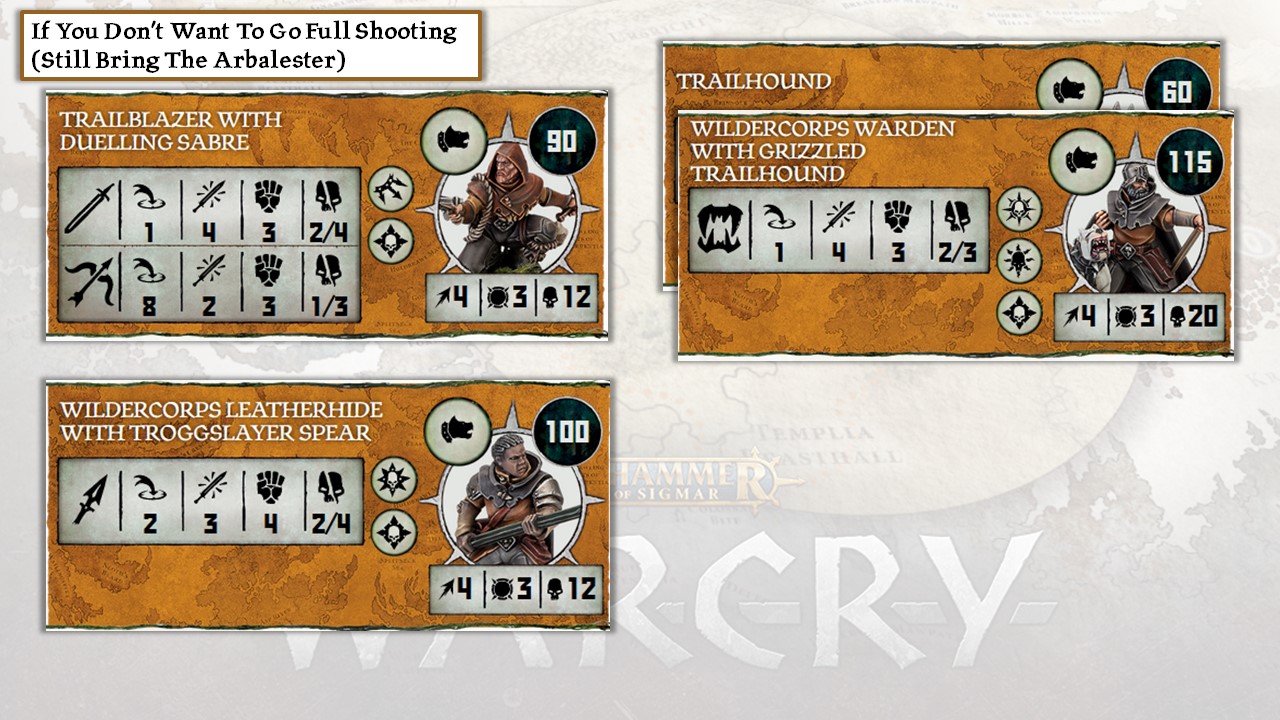
If you dont want to go full shooting, and perhaps want to run some of the better options in the box, I would still suggest your Arbalester, backed up by Leatherhides with Troggslayer Spears, Warden with 4x Trailhounds and Trailblazers as normal. Finally, if you were running one box of Wildercorps Hunters, you can fill out your list with Hatchet Scouts.

